Software AG Apama provides a SOAP-based Web Services Client adapter to invoke web services from your Apama application. In this post, we will see how to use this adapter in your application.
We will use a free web service available at CDYNE (link) for our application. This service has multiple operations, out of which we will use GetCityWeatherByZIP operation.
Below are the sample request and response messages for this operation, which we will use to describe our event definition in Apama.
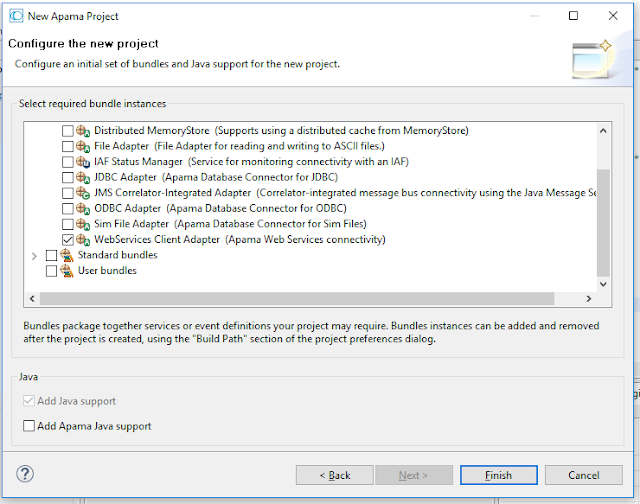
Let’s begin by creating a new Apama project. We will name it WeatherWebServiceDemo.
While creating the project using ‘New Apama Project Wizard’, select ‘Web Services Client Adapter’ bundle
Now let’s describe the event definitions. We will define events such that their structure corresponds directly to the XML structure of the web service message shown above. Such type of mapping is called as ‘Convention based’ mapping where Apama automatically converts the event instance to the request XML structure of the web service, and also converts the web service response XML to an event instance.
Out of these the MyRequest and MyResponse event definitions are wrapper types required for Convention based mapping, whereas MyZIP is our custom event definition which we will use to request weather information for a zip code.
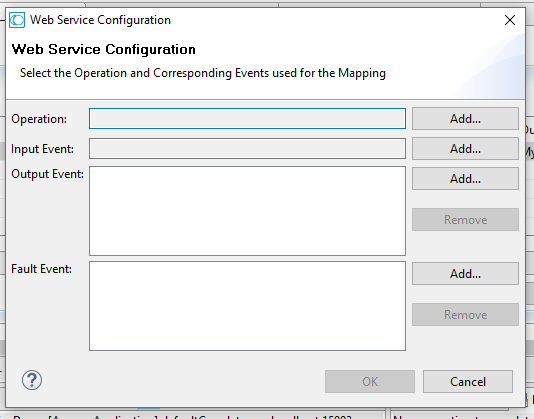
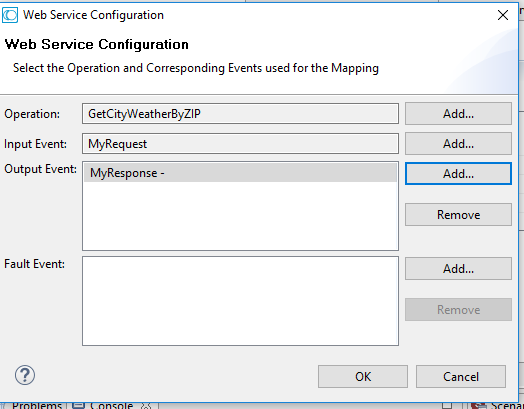
After describing the event definitions, we can import the WSDL and map the event definitions to web service input and output. To do that, open the adapter instance file located in Adapters->WebServices Client Adapter -> instance1 in your project and click on + (plus) to add the operation name, it will bring up the following screen to configure your web service.
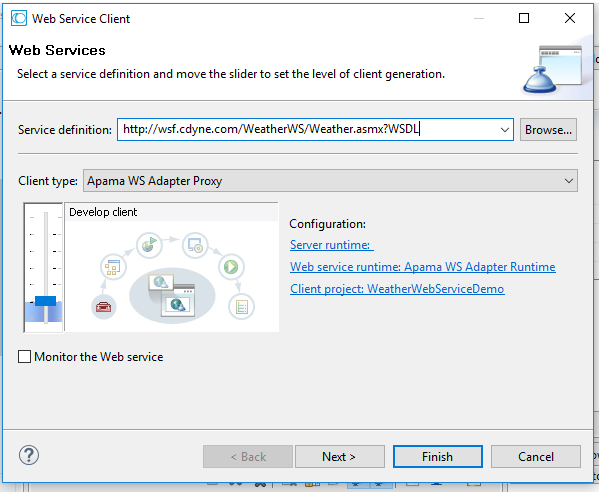
In this screen click on ‘Add’ operation, and then click on ‘Create New’ to bring the following screen to import the WSDL and select the operation that you want to use.
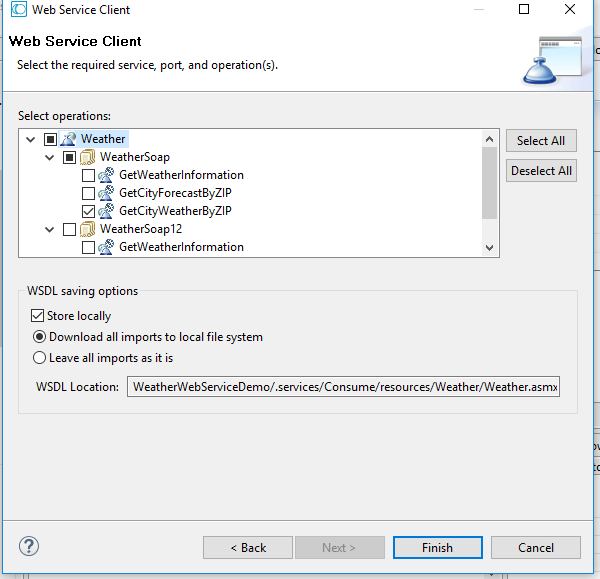
We will only import GetCityWeatherByZIP operation for our application as shown below.
After importing the operation select the input and output event types corresponding to the input and output of the operation
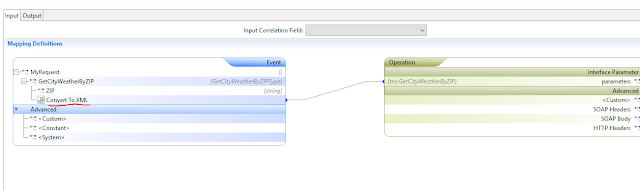
Once input and output event for the web service is selected, you can perform the mapping of fields to web service parameters
In the input mapping it’s important to select the ‘Convert to XML’ transformation to convert the event structure to XML. You can select this transformation by using ‘Add computed node’ option in your input mapping.
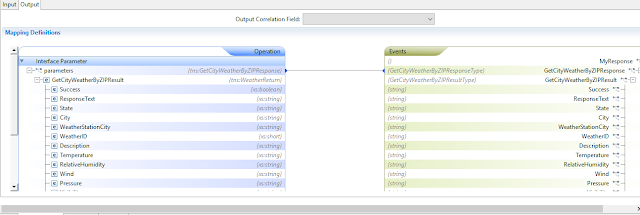
The output mapping is straightforward as shown below.
Once the mapping is completed you can write your monitor script (EPL) program to call the weather service and then identify the pattern in the data.
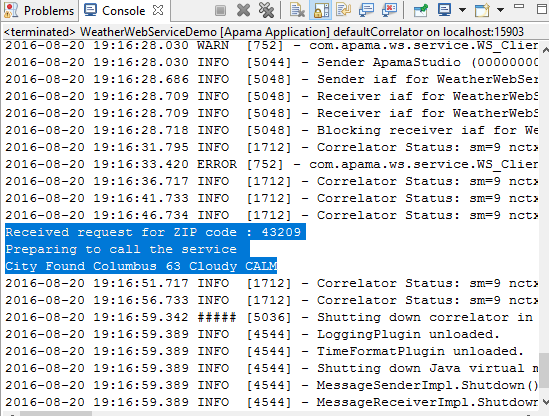
Following simple monitor script program will just print the weather information received from web service.
In this script, whenever the correlator engine detects MyZIP event in the queue, it will route the MyRequest event. MyRequest event will in turn call the web service to get the weather information using web service client adapter and receive the response in the form of MyResponse event. Whenever MyResponse event is detected, our script prints the weather information in the log.
We can invoke the web service periodically to fetch the weather information using ‘on all wait() ’ as shown below. This code snippet will route the MyZIP event every minute (60 seconds) to fetch the weather information.
1
2
3
on all wait(60.0){ MyZIP("43209");}
Instead of logging the information to a file we can actually use Apama Dashboard to visually monitor the weather fluctuation and any patterns in the data. I will explain how to do that in another post.
webMethods Integration Server supports OAuth 2.0. The Integration Server (IS) can be used as an OAuth client, an authorization server, or a resource server. This post describes how to use OAuth 2.0 with Integration Server in a simplified format.
For ease of understanding, we will consider IS as an authorization server and resource server in this post. However, the same concept can be used to set up any role that you may want IS to perform in your architecture.
Integration Server supports two types of OAuth grant types
Authorization Code:
This is a secure way of obtaining an OAuth token, where the client needs to authorize himself with the authorization server. The authorization server responds with the authorization code, which the client uses to obtain the access token. This approach is typically used by clients hosted on web server-based applications where the application code runs on the server.
Implicit:
This approach is used by mobile apps or browser-based applications. In this approach, the client does not need to authorize himself with the authorization server. The access token is passed through the browser, as a fragment in the URL. A simple javascript code can be used to extract the access token from the fragment.
We will see how to implement both approaches in the integration server. For both approaches, you need to do some basic setup on the IS console.
Client Configuration:
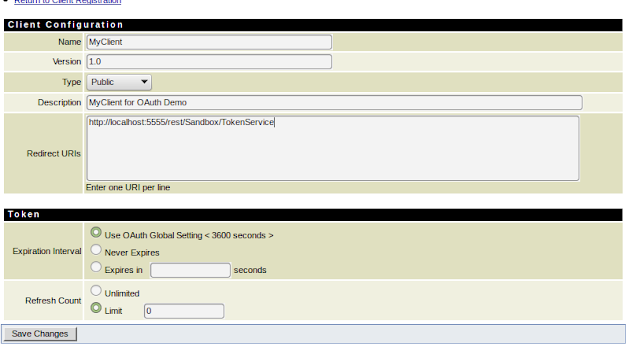
A client must register himself and obtain client_id from the integration server. In the IS console go to Security->OAuth->Client Registration page and click on ‘Register Client’. Enter the information as shown below.
Redirect URL should be the URL, where IS will redirect the page after authorizing the request. I have created a simple RESTful service on the IS as a redirect URL.
Remember that the Client ID will be generated when you click Save Changes.
Your client will use this ‘Client ID’ to authorize himself and request an access token.
Scope Management:
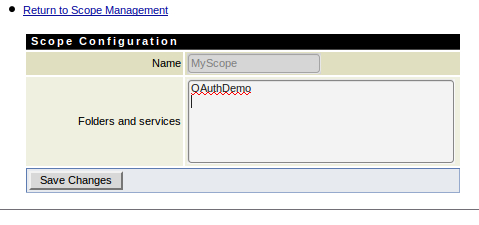
The scope indicates the resources the client can access on behalf of resource owner. You need to indicate one or more folders or services on the IS in the scope. Once a client is granted access to a scope, he can access the folders and services included in that scope.
Go to Security->Oauth->Scope Management page and click on ‘Add Scope’. Once the page is open, mention the scope details as shown below
Here we have included one service ‘OAuthDemo’ in the scope. This is an URL Alias for /rest/Sandbox.OAuthDemo folder on the server
Once the scope is added, map the scope with the client using the ‘Associate Scope to Clients’ option on the ‘Scope Management’ page.
Once this setup is done your client can request the access token either for the Authorization Code approach or Implicit approach.
Authorization Code:
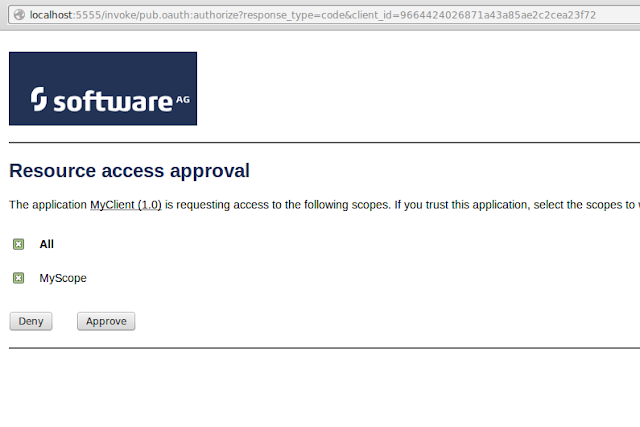
Requesting token for authorization code approach is a 2 step process. In the first step, the client authorizes himself with the authorization server using pub.auth:authorize service and receives the authorization code. Once the authorization code is received, it can be used to obtain the access token using pub.auth:getAccessToken service.
When the client initiates the pub.oauth:authorize request, it brings up a page for the resource owner to either approve the access request or reject it.
When the resource owner approves the request, the integration server generates the authorization code and redirects the page to the ‘redirect URL’ specified in the client configuration.
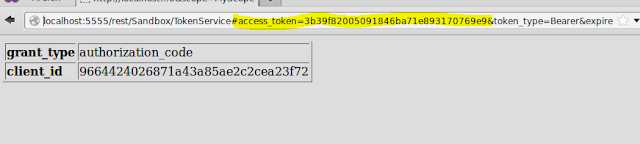
The service hosted at redirect URL passes the authorization code to pub.oauth:getAccessToken service to exchange authorization code for an access token as shown below
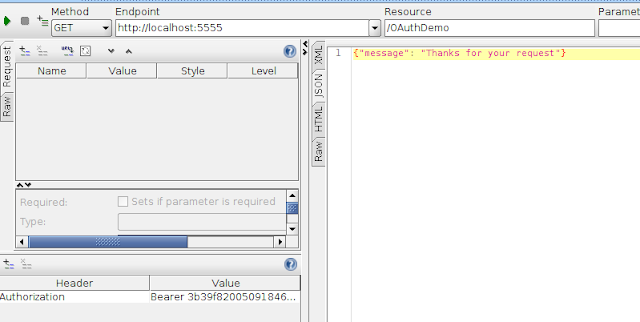
The client application can now use the access token to access the resource described in the Scope.
Implicit:
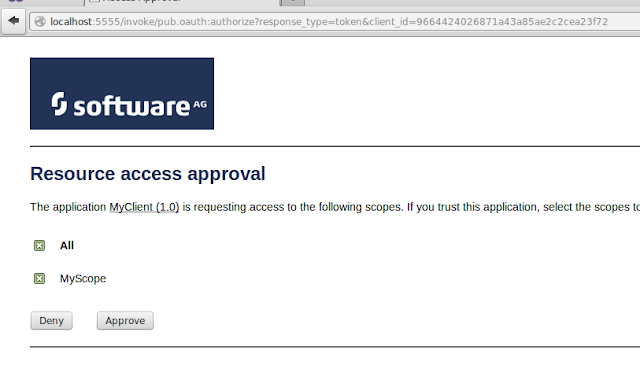
Requesting token for implicit approach is one-step process.
When the client initiates the pub.oauth:authorize request, it indicates the implicit approach by mentioning the response type as ’token’ in the input to pub.oauth:authorize service. The service brings up a page for resource owner to either approve the access request or reject it.
When the resource owner approves the request the integration server generates the access token and includes it as a fragment in the redirect URI, which the client application can extract it using simple javascript code.
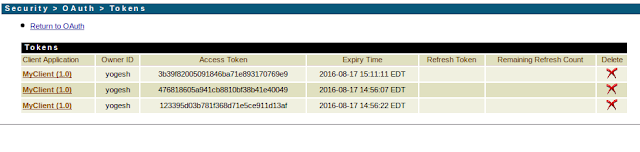
Integration Server administrator can verify all the tokens in the IS console
The client application can use the token as a bearer token to access the resource on the server.
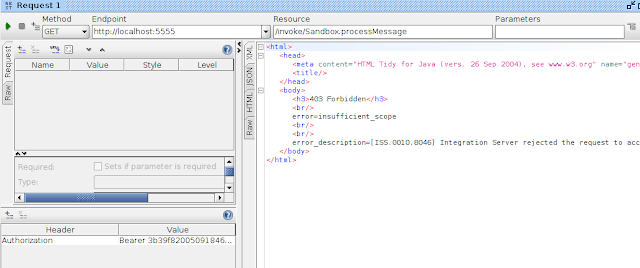
If the client application tries to use an invalid token or tries to access a service which is not in the scope, it will get an error