May 2016

Archive for May 2016

Implementing WS Security Policies for your services on webMethods Integration Server - Username and Encryption Policy

SoftwareAG provides a few out of box WS-Security policies to secure the messages to protect the authenticity and integrity of the messages. You can also create your own policies as long as the security assertions used in your policy are supported by SoftwareAG Integration Server.

Before implementing the policies for your services make sure that you have completed the prerequisite steps described in the earlier post.

The Username_Encryption policy uses a username token to provide client authentication, uses symmetric binding to encrypt messages to ensure message confidentiality, and includes a timestamp token to guard against replay attacks.

Perform following steps to implement the Username_Encryption policy for your service

a. Go to the provider descriptor in the server machine. Open the policies tab and select Username and Encryption policy from the list. Click on Ok. and save the descriptor.


b. Now if you try to invoke the connector service you will get the error as 'Invalid Security', because the provider web service expects the client to pass the necessary 'WS-Security' information in the header.

c. Attach the same policy on the consumer web service descriptor so that it will send the WS-Security information in the SOAP header while invoking the service. Make sure that you pass the 'user' and 'password' in the 'auth/message' document. This information will be used while constructing the username token.

Now when you run the service you should see a successful response.

d. Open the TCPMon screen and see the message exchange, you will notice that the timestamp has been included in the SOAP header. Also the message body itself is encrypted, so only sender and receivers are able to interpret it.


Implementing WS Security Policies for your services on webMethods Integration Server - Prerequisites

SoftwareAG webMethods Integration Server provides a few out of box WS-Security policies to secure the messages to protect the authenticity and integrity of the messages. You can also create your own policies as long as the security assertions used in your policy are supported by SoftwareAG Integration Server.

To test the SoftwareAG support for WS-Security policies we need to do some basic setup which we will discuss in this post. Please bear with me as there are multiple steps to be executed to complete the setup.

1. Create a simple WSDL (HelloWorld.wsdl)
2. Using OpenSSL tool create the key stores and trust stores for client and server

(Do not use JDK keytool to generate the key pairs. It only generates v1 certs whereas SoftwareAG policies require v3 certificates

Setup on the Server side machine

We will designate one IS as a 'Server Machine'. This IS will host the HelloWorld service and act as a provider of the service. The service provides a 'sayHello' operation for the clients to invoke. The sayHello operation will simply respond to client by prefixing 'Hello' to the input string provided by client.

a.  On the 'Server machine' create a provider descriptor for the wsdl and implement the 'sayHello' operation


 b.  Create the keystore and truststore aliases on the server machine


c.  Create provider web service end point alias on the server machine

d.  Associate the provider web service alias to the provider descriptor in the 'binding' tab


Setup on the Client side machine

We will designate another IS as a 'Client machine'. This machine will consume the WSDL and invoke the 'sayHello' operation provided by 'HelloWorld' service hosted on the 'Server machine'

a.  On the 'Client Machine' create a consumer service descriptor for the WSDL


b.  Create the keystore and truststore aliases on the client machine


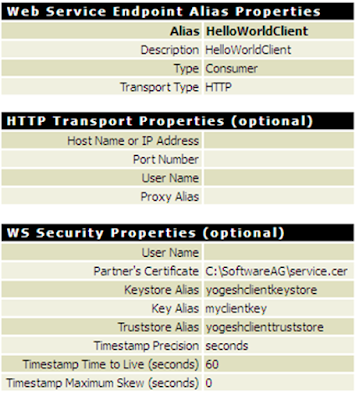
c.  Create consumer web service end point alias on the client machine
d.  Associate the consumer web service alias to the consumer descriptor in the binding tab


e.  Verify that the connector is invoking the service hosted on the server and receiving the response as expected


Setting up TCPMon

We will setup Apache TCPMon to monitor the traffic between client and server. This tool is very useful for any webservice or integration service developer.

Apache TCPMon can be downloaded from http://ws.apache.org/commons/tcpmon/

a. In the TCPMon admin tab create a new listener


 b.  In the connector service on the client machine, use the TCPMon endpoint (instead of hitting the server machine endpoint) so that the traffic is routed through TCPMon.


c.  Invoke the connector service and verify that TCPMon is able to monitor the traffic


In the screen above you can see complete request and response exchanged between client and server.

As seen in the TCPMon screen, if the message exchanges between client and server are not secure, you can ‘tap’ the message, modify and resend it, or it can even be used for ‘replay’ attacks.

This completes our setup.

Writing first Apama program in EPL

SoftwareAG Apama is a complex event processing platform to monitor rapidly moving event data feeds. It helps you detect and analyze important patterns of events and promptly acts on critical events.

Apama program written in EPL (event processing language) consists of following important components
  • event type definitions 
  • monitors
  • actions
  • listeners
  • variables
  • packages

Writing your first program in Apama is the best way to get started and understand these components.

1. Start Apama studio and create a new project


2. In the project name field type name of your project as 'HelloWorldProject' and click finish


3.  You will see following folders created in the project view. If you don't see all the folders shown below, click on the spectacle icon and they should be visible. We will not go into the significance of each folder for this simple exercise.


4. Right click on eventdefinitions folder and create a new monitorscript file.


You can create the event definition as shown in the code sample below

    
 event HelloWorld {
   string message;
 }


5. Once you have created event, you can start looking it by writing a monitor.  We will just print a simple message on console whenever this event is detected by Apama correlator engine. Right click on the monitors folder and create a new monitorscript file HelloWorldMonitor.mon

You can create the monitor script as shown in the code sample below
 
 monitor HelloWorldMonitor {
   action onload() {
     HelloWorld hw;
            
       on all HelloWorld():hw {
         print "Hello World, I got the message - " + hw.message;
       }
   }
 }


6. Start the correlator and send the message to it to test your first Apama program


Nice!